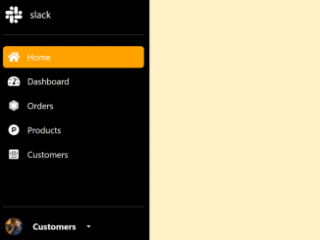
Here’s a comprehensive tutorial on how to create a dynamic Sidebar Menu Hover Show/hide Bootstrap 5 effect. This guide will walk you through the necessary HTML structure and CSS styling to achieve a sleek and interactive sidebar.
Step 1: Include Header Assets
First, you’ll need to include the necessary CSS stylesheets in the “ section of your HTML document. This includes Bootstrap for styling and Font Awesome for icons.
<link rel='stylesheet' href='https://cdn.jsdelivr.net/npm/bootstrap@5.2.3/dist/css/bootstrap.min.css'>
<link rel='stylesheet' href='https://cdnjs.cloudflare.com/ajax/libs/font-awesome/5.15.4/css/all.min.css'>
Step 2: Create the HTML Structure
Next, build the HTML structure for your sidebar menu. This involves creating a container for the sidebar and adding the necessary navigation links and a dropdown for user settings.
<body>
    <header>
        <div class="d-flex flex-column flex-shrink-0 sidebar-wrap">
            <a href="/" class="text-decoration-none logo-wrap">
                <div class="icon-wrap"><i class="fab fa-slack"></i></div> <span>slack</span>
            </a>
            <hr>
            <ul class="nav nav-pills flex-column mb-auto">
                <li class="nav-item">
                    <a href="#" class="nav-link active" aria-current="page">
                        <div class="icon-wrap">
                            <i class="fas fa-home"></i>
                        </div>
                        <span> Home</span>
                    </a>
                </li>
                <li>
                    <a href="#" class="nav-link">
                        <div class="icon-wrap">
                            <i class="fas fa-tachometer-alt"></i>
                        </div>
                        <span>Dashboard</span>
                    </a>
                </li>
                <li>
                    <a href="#" class="nav-link">
                        <div class="icon-wrap">
                            <i class="fab fa-first-order"></i>
                        </div>
                        <span>Orders</span>
                    </a>
                </li>
                <li>
                    <a href="#" class="nav-link">
                        <div class="icon-wrap">
                            <i class="fab fa-product-hunt"></i>
                        </div>
                        <span>Products</span>
                    </a>
                </li>
                <li>
                    <a href="#" class="nav-link">
                        <div class="icon-wrap">
                            <i class="fab fa-intercom"></i>
                        </div>

                        <span>Customers</span>
                    </a>
                </li>
            </ul>
            <hr>
            <div class="dropdown">
                <a href="#" class="text-decoration-none dropdown-toggle  dropdown-wrap" id="dropdownUser2"
                    data-bs-toggle="dropdown" aria-expanded="false">
                    <div class="icon-wrap">
                        <img src="https://github.com/mdo.png" alt="" width="32" height="32" class="rounded-circle">
                    </div>
                    <strong>Customers</strong>
                </a>
                <ul class="dropdown-menu text-small shadow" aria-labelledby="dropdownUser2">
                    <li><a class="dropdown-item" href="#">New project...</a></li>
                    <li><a class="dropdown-item" href="#">Settings</a></li>
                    <li><a class="dropdown-item" href="#">Profile</a></li>
                    <li>
                        <hr class="dropdown-divider">
                    </li>
                    <li><a class="dropdown-item" href="#">Sign out</a></li>
                </ul>
            </div>
        </div>
    </header>
</body>
Step 3: Add CSS Styling
Now, let’s add CSS to style the sidebar and implement the hover show/hide effect. The following CSS will control the width of the sidebar and the visibility of the text labels within it.
.sidebar-wrap {
  width: 60px;
  height: 100vh;
  background-color: #000;
  color: #fff;
  padding: 10px;
  transition: 0.8s;
}
.sidebar-wrap:hover {
  width: 280px;
}
.sidebar-wrap:hover .logo-wrap span {
  display: flex;
}
.sidebar-wrap:hover .nav li .nav-link span {
  display: flex;
}
.sidebar-wrap:hover .dropdown-wrap strong {
  display: flex;
}
.sidebar-wrap:hover .dropdown-wrap::after {
  display: inline-block;
}
.sidebar-wrap:hover .dropdown-wrap {
  justify-content: flex-start;
}
.sidebar-wrap .logo-wrap {
  color: #fff;
  font-size: 35px;
  display: flex;
  align-items: center;
  gap: 10px;
}
.sidebar-wrap .logo-wrap span {
  font-size: 18px;
}
.sidebar-wrap .logo-wrap .icon-wrap {
  display: flex;
  align-items: center;
  justify-content: center;
  height: 40px;
  min-width: 40px;
}
.sidebar-wrap .nav {
  height: 100%;
  overflow-x: hidden;
  overflow-y: auto;
  flex-wrap: nowrap;
}
.sidebar-wrap .nav::-webkit-scrollbar-track {
  -webkit-box-shadow: inset 0 0 6px rgba(0, 0, 0, 0.3);
  border-radius: 5px;
  background-color: #f5f5f5;
}
.sidebar-wrap .nav::-webkit-scrollbar {
  width: 5px;
  background-color: #f5f5f5;
  border-radius: 5px;
}
.sidebar-wrap .nav::-webkit-scrollbar-thumb {
  border-radius: 5px;
  -webkit-box-shadow: inset 0 0 6px rgba(0, 0, 0, 0.3);
  background-color: #9b9b9b;
}
.sidebar-wrap .nav li {
  margin-top: 5px;
}
.sidebar-wrap .nav li .nav-link {
  color: #fff;
  padding: 0;
  font-size: 20px;
  display: flex;
  align-items: center;
  gap: 5px;
}
.sidebar-wrap .nav li .nav-link .icon-wrap {
  display: flex;
  align-items: center;
  justify-content: center;
  height: 40px;
  min-width: 40px;
}
.sidebar-wrap .nav li .nav-link span {
  font-size: 16px;
}
.sidebar-wrap .nav li .nav-link.active {
  background-color: #ffa200;
}
.sidebar-wrap .nav li .nav-link:hover {
  background-color: #ffa200;
}
.sidebar-wrap .dropdown-wrap {
  display: flex;
  align-items: center;
  color: #fff;
  gap: 15px;
  font-size: 16px;
}
.sidebar-wrap .dropdown-wrap .icon-wrap {
  min-width: 40px;
  height: 40px;
  display: flex;
  align-items: center;
  justify-content: center;
}
With these steps, you’ve successfully created a sidebar menu that expands on hover using Bootstrap and CSS. This enhances user experience by providing a clean and intuitive navigation system.

