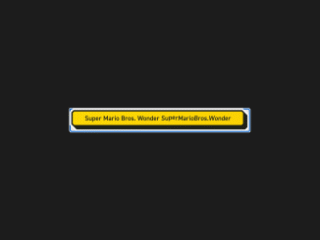
Here’s a tutorial on creating a captivating Css Button With Waving Text Effect. This guide will walk you through the HTML structure, CSS styling, and JavaScript functionality needed to bring your button to life with a dynamic waving text animation.
Adding Header Assets
Before diving into the HTML structure, it’s essential to include the necessary CSS stylesheet link within the section of your HTML document. This external stylesheet provides the initial styling for the button.
<link rel='stylesheet' href='https://codepen.io/nicolasjesenberger/pen/GRYvOWy/d5176f9552830811da3e2bde0120cc26.css'>
Creating the HTML Structure
The HTML structure provides the foundation for our animated button.
<button class="button" type="button">
  <span class="button-outline">
    <span class="button-shadow">
      <span class="button-inside">
        <span class="button-text visually-hidden">Super Mario Bros. Wonder</span>
        <span class="button-text-characters-container" aria-hidden="true"></span>
      </span>
    </span>
  </span>
</button>
Styling the Button with CSS
Now, let’s style our button using CSS. The following CSS code defines the visual appearance of the button, including its colors, fonts, shadows, and the hover effects that trigger the waving animation. Pay close attention to the clip-path properties, which are crucial for creating the layered effect.
@font-face {
  src: url("https://assets.codepen.io/4175254/DIN2014-DemiBold.ttf") format("truetype");
  font-family: 'DIN 2014';
  font-weight: 600;
}
body {
  display: flex;
  justify-content: center;
  align-items: center;
  min-height: 100vh;
  min-height: 100dvh;
  background-color: #1c1c1c;
}

.button {
  --bevel: 3px;
  --border-width: 3px;
  font-family: 'DIN 2014';
  font-weight: 600;
  color: #1d2119;
  filter: drop-shadow(1px 1px 1px rgba(0, 0, 0, 0.95));
  min-width: 10em;
}

.button-outline {
  --bevel-1: calc((var(--bevel) + (var(--border-width)) * 2) - ((var(--border-width) * 0.41421)) * 2);
  --bevel-2: calc(var(--bevel-1) + var(--border-width));
  --bevel-3: calc(var(--bevel-2) + var(--border-width));
  display: block;
  margin-top: calc(var(--border-width) * -1);
  margin-left: calc(var(--border-width) * -1);
  padding: var(--border-width);
  background-color: #fff;
  clip-path: polygon(var(--bevel-2) var(--border-width), calc(100% - var(--bevel-2)) var(--border-width), 100% var(--bevel-3), 100% calc(100% - var(--bevel-1)), calc(100% - var(--bevel-1)) 100%, var(--bevel-3) 100%, var(--border-width) calc(100% - var(--bevel-2)), var(--border-width) var(--bevel-2));
  transition-property: clip-path;
  transition-duration: .2s;
}
.button:hover:not(:active) .button-outline, .button:focus-visible:not(:active) .button-outline {
  clip-path: polygon(var(--bevel-1) 0, calc(100% - var(--bevel-3)) 0, 100% var(--bevel-3), 100% calc(100% - var(--bevel-1)), calc(100% - var(--bevel-1)) 100%, var(--bevel-3) 100%, 0 calc(100% - var(--bevel-3)), 0 var(--bevel-1));
}

.button-shadow {
  --padding: calc(var(--border-width) * 2);
  --bevel-1: calc((var(--bevel) + var(--border-width)) - (var(--border-width) * 0.41421));
  --bevel-2: calc(var(--bevel-1) + var(--border-width));
  --bevel-3: calc(var(--bevel-2) + var(--border-width));
  display: block;
  padding: calc(var(--border-width) * 2) var(--padding) var(--padding) calc(var(--border-width) * 2);
  background-color: #1d2119;
  clip-path: polygon(var(--bevel-2) var(--border-width), calc(100% - var(--bevel-2)) var(--border-width), 100% var(--bevel-3), 100% calc(100% - var(--bevel-1)), calc(100% - var(--bevel-1)) 100%, var(--bevel-3) 100%, var(--border-width) calc(100% - var(--bevel-2)), var(--border-width) var(--bevel-2));
  transition-property: clip-path;
  transition-duration: .2s;
}
.button:hover:not(:active) .button-shadow, .button:focus-visible:not(:active) .button-shadow {
  clip-path: polygon(var(--bevel-1) 0, calc(100% - var(--bevel-3)) 0, 100% var(--bevel-3), 100% calc(100% - var(--bevel-1)), calc(100% - var(--bevel-1)) 100%, var(--bevel-3) 100%, 0 calc(100% - var(--bevel-3)), 0 var(--bevel-1));
}

.button-inside {
  --padding-vertical: 6px;
  display: block;
  padding: var(--padding-vertical) 24px calc(var(--padding-vertical) - .125em);
  background-color: #fff;
  clip-path: polygon(var(--bevel) 0, calc(100% - var(--bevel)) 0, 100% var(--bevel), 100% calc(100% - var(--bevel)), calc(100% - var(--bevel)) 100%, var(--bevel) 100%, 0 calc(100% - var(--bevel)), 0 var(--bevel));
  text-align: center;
  transition-property: transform;
  transition-duration: .2s;
}
.button:hover:not(:active) .button-inside, .button:focus-visible:not(:active) .button-inside {
  transform: translate(calc(var(--border-width) * -1), calc(var(--border-width) * -1));
}
.button:hover .button-inside, .button:focus-visible .button-inside {
  background-color: #fcd200;
  background-image: linear-gradient(to right, rgba(0, 0, 0, 0), rgba(252, 210, 0, 0.9)), radial-gradient(#fff60d 1px, rgba(0, 0, 0, 0) 0%), radial-gradient(#fff60d 1px, rgba(0, 0, 0, 0) 0%);
  background-size: auto, 6px 6px, 6px 6px;
  background-position: 0 0, 0 0, 3px 3px;
  animation: scroll-background 1s linear infinite;
}

@keyframes scroll-background {
  to {
    background-position-x: 0, -6px, -3px;
  }
}
.button-text-characters-container {
  display: inline-block;
  transform: skewX(-6deg);
}

.button-text-character {
  display: inline-block;
}
.button:hover:not(:active) .button-text-character, .button:focus-visible:not(:active) .button-text-character {
  animation: jump 4s cubic-bezier(0.75, 0.25, 1, 2) var(--delay) infinite;
}

@keyframes jump {
  5% {
    transform: translateY(-0.125em);
  }
  10% {
    transform: translateY(0);
  }
}
Implementing the Waving Text Animation with JavaScript
To achieve the waving text effect, we’ll use JavaScript to manipulate the text content of the button. The JavaScript code below splits the text into individual characters, wraps each character in a element, and applies a staggered animation delay to create the waving effect when the button is hovered over.
const buttonText = document.querySelector('.button-text');
const buttonTextCharactersContainer = document.querySelector('.button-text-characters-container');

const buttonTextCharacters = buttonText.textContent.split('');

const characterCountWithoutWhitespaces = buttonTextCharacters.filter(character => character => !/\s/.test(character)).length;

const buttonTextCharactersFragment = document.createDocumentFragment();

let characterIndex = 1;

buttonTextCharacters.forEach(character => {
  const span = document.createElement('span');
  span.textContent = character;

  if (!/\s/.test(character)) {
    span.classList.add('button-text-character');
    const delay = `calc(2s / ${characterCountWithoutWhitespaces} * ${characterIndex} + 1s)`;
    span.style.setProperty('--delay', delay);

    characterIndex++;
  }

  buttonTextCharactersFragment.appendChild(span);
});

buttonTextCharactersContainer.appendChild(buttonTextCharactersFragment);
Adding Footer Assets
No specific assets are needed in footer for this example.
By following these steps, you’ve successfully created a Css Button With Waving Text Effect. The combination of HTML structure, CSS styling, and JavaScript animation results in a visually appealing and interactive button.

