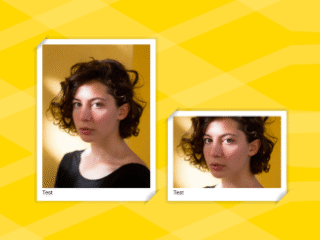
Here’s a comprehensive tutorial on how to Expand Image On Hover And Show Caption using HTML and CSS. This effect provides an engaging way to present images and related information on your website, enhancing user experience.
HTML Structure
First, let’s create the basic HTML structure. This involves setting up a container for our images and captions. We’ll use `section`, `div` elements to structure the content.
<base href="https://rawcdn.githack.com/MuhammadHasann/component-frontend/7e3a0bced6f1b050e8d0b621f2a3a6e7b1cb06d3/section/category%20card-2/" />
<dialog open>Reply to <a href="https://twitter.com/asanagih/status/1764194084435181573" target="_blank"> tweet</a> by <a href="https://hasanmolla.vercel.app/" target="_blank">HASAN MOLLA</a></dialog>
<section class="container">
	<div class="category_container">
		<div class="content">
			<img src="assets/UI UX Designer.jpg" class="professio_image" alt="Profession" />
			<img src="assets/John Doe.jpg" class="profile_image" alt="Profile" />
			<div class="profile_detail">
				<span>John Doe</span>
				<p>UI/UX Designer + Graphic Designer</p>
			</div>

			<div class="wrapper">
				<div class="profile_quote">
					<p>"UI is the saddle, the stirrups, & the reins. UX is the feeling you get being able to ride the horse."</p>
				</div>
			</div>

		</div>
		<div class="content">
			<img src="assets/Photographer.jpg" class="profession_image" alt="Profession" />
			<img src="assets/Prince Akashi.jpg" class="profile_image" alt="Profile" />
			<div class="profile_detail">
				<span>Prince Akashi</span>
				<p>Photographer + Model</p>
			</div>
			<div class="wrapper">
				<div class="profile_quote">
					<p>"If you see something that moves you, and then snap it, you keep a moment."</p>
				</div>
			</div>
		</div>
		<div class="content">
			<img src="assets/Fashion Designer.jpg" class="profession_image" alt="Profession" />
			<img src="assets/Rafaella Mendes.jpg" class="profile_image" alt="Profile" />
			<div class="profile_detail">
				<span>Rafaella Mendes</span>
				<p>Fashion Designer + Model</p>
			</div>
			<div class="wrapper">
				<div class="profile_quote">
					<p>"My mission in life is not merely to survive, but to thrive and to do so with some passion, some compassion, some humor, and some style."</p>
				</div>
			</div>
		</div>
	</div>
</section>
CSS Styling
Next, we’ll add CSS to style the HTML elements, creating the hover effect and controlling the appearance of the caption. This will involve positioning, transitions, and opacity changes.
@import url("https://fonts.googleapis.com/css2?family=Inter:wght@100..900&display=swap");
* {
  padding: 0;
  margin: 0;
  box-sizing: border-box;
}

body {
  font-family: "Inter", sans-serif;
}

:root {
  --light: #ffe6e6;
  --dark: #0c0c0c;
}

.container {
  --bg-color: radial-gradient(
  	circle at 50% 0%,
  	rgba(50, 50, 50, 1) 0%,
  	rgba(12, 12, 12, 1) 100%
  );
  overflow: clip;
  position: relative;
  display: flex;
  justify-content: center;
  align-items: center;
  padding: 2rem 5rem;
  width: 100%;
  height: 100dvh;
  background-image: var(--bg-color);
}

.category_container {
  --gap: 0.5rem;
  display: flex;
  justify-content: space-between;
  align-items: center;
  flex-wrap: nowrap;
  gap: calc(var(--gap) * 2);
  width: 100%;
  height: 100%;
}

.content {
  --active: 0;
  cursor: pointer;
  overflow: clip;
  position: relative;
  z-index: 10;
  display: flex;
  flex-direction: column;
  justify-content: flex-end;
  gap: 1.5rem;
  padding: 2.5rem;
  width: calc((100% / 3) - var(--gap));
  height: 100%;
  border-radius: 1rem;
  transition: width 0.5s ease-in-out;
}

.content:hover {
  --active: 1;
  width: calc(70% - var(--gap));
}

.content::before {
  content: "";
  position: absolute;
  z-index: -10;
  top: 0;
  left: 0;
  width: 100%;
  height: 100%;
  background-color: var(--dark);
  opacity: 0.6;
}

.content img {
  position: absolute;
  z-index: -20;
  top: 0;
  left: 0;
  width: 100%;
  height: 100%;
  -o-object-fit: cover;
     object-fit: cover;
  -o-object-position: center;
     object-position: center;
}

.content .profile_image {
  opacity: calc(1 - var(--active));
  transition: opacity 0.3s ease-in-out;
}

.profile_detail {
  display: flex;
  flex-direction: column;
  gap: 0.5rem;
  width: 12rem;
  transition: transform 0.5s cubic-bezier(0.23, 0.93, 0.77, 1) 0.01s;
}

.profile_detail span {
  font-size: 1.5rem;
  font-weight: 600;
  color: var(--light);
  text-wrap: nowrap;
}

.profile_detail p {
  font-size: 0.75rem;
  font-weight: 500;
  color: var(--light);
}

.profile_quote {
  width: 22rem;
  transform: translate(0, calc((1 - var(--active)) * (100% + 2.5rem)));
}

.profile_quote p {
  font-size: 1.5rem;
  font-weight: 600;
  color: var(--light);
  transform: translate(0, calc((1 - var(--active)) * (100% + 2.5rem)));
  transition: transform 0.5s cubic-bezier(0.23, 0.93, 0.77, 1) 0.1s;
}

.wrapper {
  display: grid;
  grid-template-rows: 0fr;
  overflow: hidden;
  transition: grid-template-rows 0.5s cubic-bezier(0.23, 0.93, 0.77, 1) 0.01s;
  transition: grid-template-rows 0.5s cubic-bezier(0.23, 0.93, 0.77, 1) 0.01s, -ms-grid-rows 0.5s cubic-bezier(0.23, 0.93, 0.77, 1) 0.01s;
}

.profile_quote {
  min-height: 0;
  transform: translateY(50%);
  opacity: 0;
  transition: opacity 0.8s ease-in-out, transform 0.8s cubic-bezier(0.23, 0.93, 0.77, 1) 0.01s;
}

.content:hover .wrapper {
  grid-template-rows: 1fr;
}

.content:hover .profile_quote {
  transform: none;
  opacity: 1;
}

dialog {
  position: absolute;
  z-index: 1;
  background: none;
  color: white;
  border: 0;
  font-size: 0.8rem;
  padding: 0.5em;
}

dialog a {
  color: whitesmoke;
}
This tutorial walked you through creating an interactive image gallery where images expand on hover and display a caption. With HTML for structure and CSS for styling and transitions, you can easily implement this engaging feature on your website.