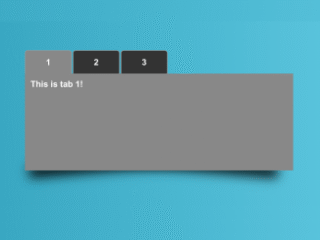
Here’s a comprehensive tutorial on creating HTML Tabs Using Radio Input And CSS. This method offers a simple, lightweight approach to tabbed content without relying on JavaScript. Let’s dive into the steps required.
Setting Up the HTML Structure
First, we need to structure our HTML to include radio inputs, labels for the tabs, and divs for the tab content. The radio inputs will control which tab is active, and the labels will act as the clickable tabs.
<div id="page-wrap">
<input type="radio" name="tab" id="tab1" checked>
<label class="" for="tab1">1</label>
<input type="radio" name="tab" id="tab2">
<label class="" for="tab2">2</label>
<input type="radio" name="tab" id="tab3">
<label class="" for="tab3">3</label>
<div id="tab1tab" class="tab-content">This is tab 1!</div>
<div id="tab2tab" class="tab-content">Whoah! Tab 2 here!</div>
<div id="tab3tab" class="tab-content">Here's a tertiary tab!</div>
</div>
Applying CSS Styling
Now, let’s add the CSS to style the tabs and control their appearance and behavior. We’ll hide the radio inputs and use the `checked` state to show the corresponding tab content.
*,*:after,*:before{box-sizing:border-box;}
#page-wrap {
  width: 450px;
  margin: 40px auto;
  box-shadow: 0 3px 5px #666;
  overflow: visible;
  float: left;
  background: #ebebeb;
  border-radius: 5px;
  position: relative;
  z-index: 1;
}

#page-wrap:after,
#page-wrap:before {
  content: "";
  width: 90%;
  position: absolute;
  height: 20px;
  box-shadow: 0 20px 20px #000;
  bottom: 25px;
  transform: rotate(5deg);
  z-index: -1;
  right: 5px
}

#page-wrap:after {
  transform: rotate(-5deg);
  left: 5px;
}

input[type="radio"] {
  position: absolute;
  left: -100%;
}

label {
  display: block;
  border-radius: 5px 5px 0 0;
  border: 1px solid #999;
  width: 80px;
  height: 40px;
  float: left;
  margin-right: 2px;
  text-align: center;
  line-height: 40px;
  color: #fff;
  font-family: arial;
  font-weight: bold;
  cursor: pointer;
  margin-bottom:-1px;
  background:#333;
}

.tab-content {
  color: #fff;
  background:#888;
  font-family: arial;
  font-weight: bold;
  padding: 0 10px;
  width: 100%;
  float: left;
  height: 0em;
  overflow: hidden;
  transition: 0.5s;
}
input[type="radio"]:checked+label{background:#888}
#tab1:checked~#tab1tab {
  height: 150px;
  padding: 10px;
}

#tab2:checked~#tab2tab {
  height: 150px;
  padding: 10px;
}

#tab3:checked~#tab3tab {
  height: 150px;
  padding: 10px;
}
With these steps, you’ve successfully implemented HTML Tabs Using Radio Input And CSS. This method provides a clean, accessible, and performant way to organize content on your web pages.

