This tutorial will guide you through the process of creating a dynamic and visually appealing **Portfolio Filter Gallery Bootstrap 5**. By using Bootstrap 5 along with JavaScript, you’ll be able to create a filterable gallery that showcases your work in an organized and engaging way.
Step 1: Include Header Assets
Include the necessary CSS link in the head section of your HTML to normalize styles and import fonts.
<link rel="stylesheet" href="https://public.codepenassets.com/css/normalize-5.0.0.min.css">
Step 2: Construct the HTML Structure
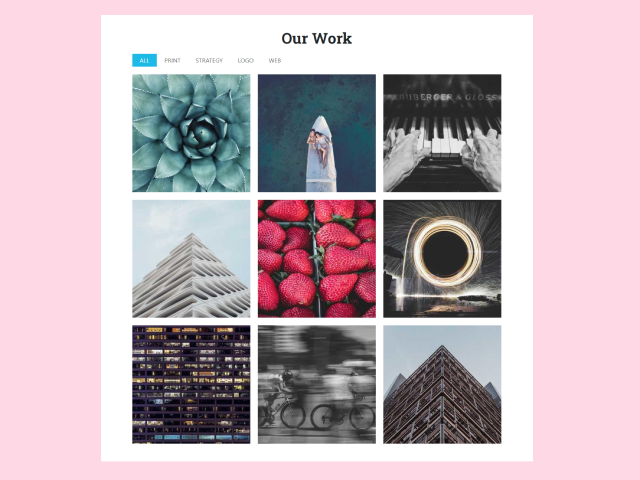
Create the main HTML structure for your portfolio gallery, including the filter buttons and gallery items. The provided structure includes filter options for “All,” “Print,” “Strategy,” “Logo,” and “Web,” along with several example gallery items.
<div class="wrap">
  <h1>Our Work</h1>

  <div class="gallery-wrap">

    <ul id="filters" class="clearfix">
      <li><span class="filter active" data-filter=".print, .strategy, .logo, .web">All</span></li>
      <li><span class="filter" data-filter=".print">Print</span></li>
      <li><span class="filter" data-filter=".strategy">Strategy</span></li>
      <li><span class="filter" data-filter=".logo">Logo</span></li>
      <li><span class="filter" data-filter=".web">Web</span></li>
    </ul>

    <div id="gallery">

    <a class="gallery-item logo" href="#" data-cat="logo">
      <div class="inside">
        <div class="details">
          <div class="text">
            <h2>Client Name</h2>
            <p>Logo</p>
          </div>
        </div>
        <div class="overlay"></div>
        <img src="https://unsplash.it/500/500?image=1084" alt="" />
      </div>
    </a>

    <a class="gallery-item logo" href="#" data-cat="logo">
      <div class="inside">
        <div class="details">
          <div class="text">
            <h2>Client Name</h2>
            <p>Logo</p>
          </div>
        </div>
        <div class="overlay"></div>
        <img src="https://unsplash.it/500/500?image=1083" alt="" />
      </div>
    </a>

    <a class="gallery-item web" href="#" data-cat="web">
      <div class="inside">
        <div class="details">
          <div class="text">
            <h2>Client Name</h2>
            <p>Web</p>
          </div>
        </div>
        <div class="overlay"></div>
        <img src="https://unsplash.it/500/500?image=1082" alt="" />
      </div>
    </a>

    <a class="gallery-item print" href="#" data-cat="print">
      <div class="inside">
        <div class="details">
          <div class="text">
            <h2>Client Name</h2>
            <p>Print</p>
          </div>
        </div>
        <div class="overlay"></div>
        <img src="https://unsplash.it/500/500?image=1081" alt="" />
      </div>
    </a>

    <a class="gallery-item strategy" href="#" data-cat="strategy">
      <div class="inside">
        <div class="details">
          <div class="text">
            <h2>Client Name</h2>
            <p>Strategy</p>
          </div>
        </div>
        <div class="overlay"></div>
        <img src="https://unsplash.it/500/500?image=1080" alt="" />
      </div>
    </a>

    <a class="gallery-item strategy web print" href="#" data-cat="strategy web print">
      <div class="inside">
        <div class="details">
          <div class="text">
            <h2>Client Name</h2>
            <p>Strategy. Web. Print.</p>
          </div>
        </div>
        <div class="overlay"></div>
        <img src="https://unsplash.it/500/500?image=1079" alt="" />
      </div>
    </a>

    <a class="gallery-item web" href="#" data-cat="web">
      <div class="inside">
        <div class="details">
          <div class="text">
            <h2>Client Name</h2>
            <p>Web.</p>
          </div>
        </div>
        <div class="overlay"></div>
        <img src="https://unsplash.it/500/500?image=1078" alt="" />
      </div>
    </a>

    <a class="gallery-item strategy" href="#" data-cat="strategy">
      <div class="inside">
        <div class="details">
          <div class="text">
            <h2>Client Name</h2>
            <p>Strategy.</p>
          </div>
        </div>
        <div class="overlay"></div>
        <img src="https://unsplash.it/500/500?image=1077" alt="" />
      </div>
    </a>

    <a class="gallery-item web strategy" href="#" data-cat="web strategy">
      <div class="inside">
        <div class="details">
          <div class="text">
            <h2>Client Name</h2>
            <p>Strategy. Web.</p>
          </div>
        </div>
        <div class="overlay"></div>
        <img src="https://unsplash.it/500/500?image=1076" alt="" />
      </div>
    </a>

    </div><!--/gallery-->

  </div><!--/gallery-wrap-->

</div>
Step 3: Apply CSS Styling
Use the CSS styles to visually enhance the gallery, including fonts, colors, layout, and hover effects. This CSS provides the basic styling for the layout, filters, and gallery items, ensuring a visually appealing presentation.
@import 'https://fonts.googleapis.com/css?family=Lato|Roboto+Slab:700';
html {
  box-sizing: border-box;
}

*,
*:before,
*:after {
  box-sizing: inherit;
}

body {
  background: #f1f1f1;
  color: #444;
  font-family: "Lato", sans-serif;
  font-size: 1em;
  line-height: 1.625;
}

img {
  max-width: 100%;
  height: auto;
}

h1, h2, h3 {
  font-family: "Roboto Slab", serif;
}

.wrap {
  margin: 0 auto;
  max-width: 1000px;
  width: 100%;
}

h1 {
  text-align: center;
  margin: 50px 0;
}

.gallery-wrap,
#gallery {
  overflow: hidden;
}

#filters {
  margin: 1%;
  padding: 0;
  list-style: none;
  overflow: hidden;
}

#filters li {
  float: left;
}

#filters li span {
  display: block;
  padding: 5px 20px;
  text-decoration: none;
  color: #666;
  cursor: pointer;
  text-transform: uppercase;
  transition: all ease-in-out 0.25s;
}

#filters li:hover span {
  color: #000;
}

#filters li span.active {
  background: #1fbae7;
  color: #fff;
}

.gallery-item {
  float: left;
  width: 33.333%;
  padding: 10px;
  position: relative;
  z-index: 10;
  display: none;
}

.inside {
  position: relative;
  overflow: hidden;
  width: 100%;
  height: 100%;
}

.details,
.overlay {
  position: absolute;
  top: 0;
  left: 0;
  bottom: 0;
  right: 0;
  opacity: 0;
}

.details {
  display: flex;
  align-items: center;
  justify-content: center;
  z-index: 2;
  transition: all 0.3s ease-in-out;
}
.details h2 {
  color: #fff;
  font-size: 1.5em;
  font-weight: 700;
  letter-spacing: 1px;
  text-align: center;
  margin: 0;
}
.details p {
  color: #fff;
  font-size: 1em;
  letter-spacing: 2px;
  text-align: center;
  margin: 0;
  text-transform: uppercase;
}

.inside img {
  float: left;
  width: 100%;
}

.overlay {
  background: rgba(31, 186, 231, 0.8);
  z-index: 1;
  transition: all 0.7s ease-in-out;
}

.gallery-item:hover .details,
.gallery-item:hover .overlay {
  opacity: 1;
}

@media (max-width: 30em) {
  .wrap {
    padding-left: 1em;
    padding-right: 1em;
  }

  .gallery-item {
    float: none;
    width: 100%;
  }
}
Step 4: Implement JavaScript Functionality
Implement the JavaScript code to enable the filtering functionality of the gallery using MixItUp. This code initializes MixItUp and sets up the filtering logic.
$(function () {

	var filterList = {

		init: function () {

			// https://mixitup.kunkalabs.com/
			$('#gallery').mixItUp({
				selectors: {
  			  target: '.gallery-item',
  			  filter: '.filter'
  		  },
  		  load: {
    		  filter: '.print, .strategy, .logo, .web' // show all items on page load.
    		}
			});

		}

	};

	// Filter ALL the things
	filterList.init();

});
With the above steps, you have successfully built a portfolio filter gallery with Bootstrap 5. This enhanced gallery provides a great way to showcase your work in a visually appealing and interactive manner.