
This tutorial shows you how to create a Bootstrap 5 datepicker using Vanilla JS. We’ll leverage the `vanillajs-datepicker` library for datepicker functionality and integrate it seamlessly with Bootstrap 5 for styling.
Step 1: Include Necessary Assets
Add the following lines within the section of your HTML document to include the required CSS and JavaScript libraries. This will ensure that Bootstrap, Bootstrap Icons, and the datepicker library are correctly loaded.
<link rel='stylesheet' href='https://cdnjs.cloudflare.com/ajax/libs/bootstrap/5.0.2/css/bootstrap.min.css'>
<link rel='stylesheet' href='https://cdn.jsdelivr.net/npm/bootstrap-icons@1.5.0/font/bootstrap-icons.css'>
<link rel='stylesheet' href='https://cdn.jsdelivr.net/npm/vanillajs-datepicker@1.1.4/dist/css/datepicker.min.css'>
Step 2: Create the HTML Structure
Here’s the HTML code to create three different datepicker examples: one with only a floating label, one with only an input group, and one that combines both.
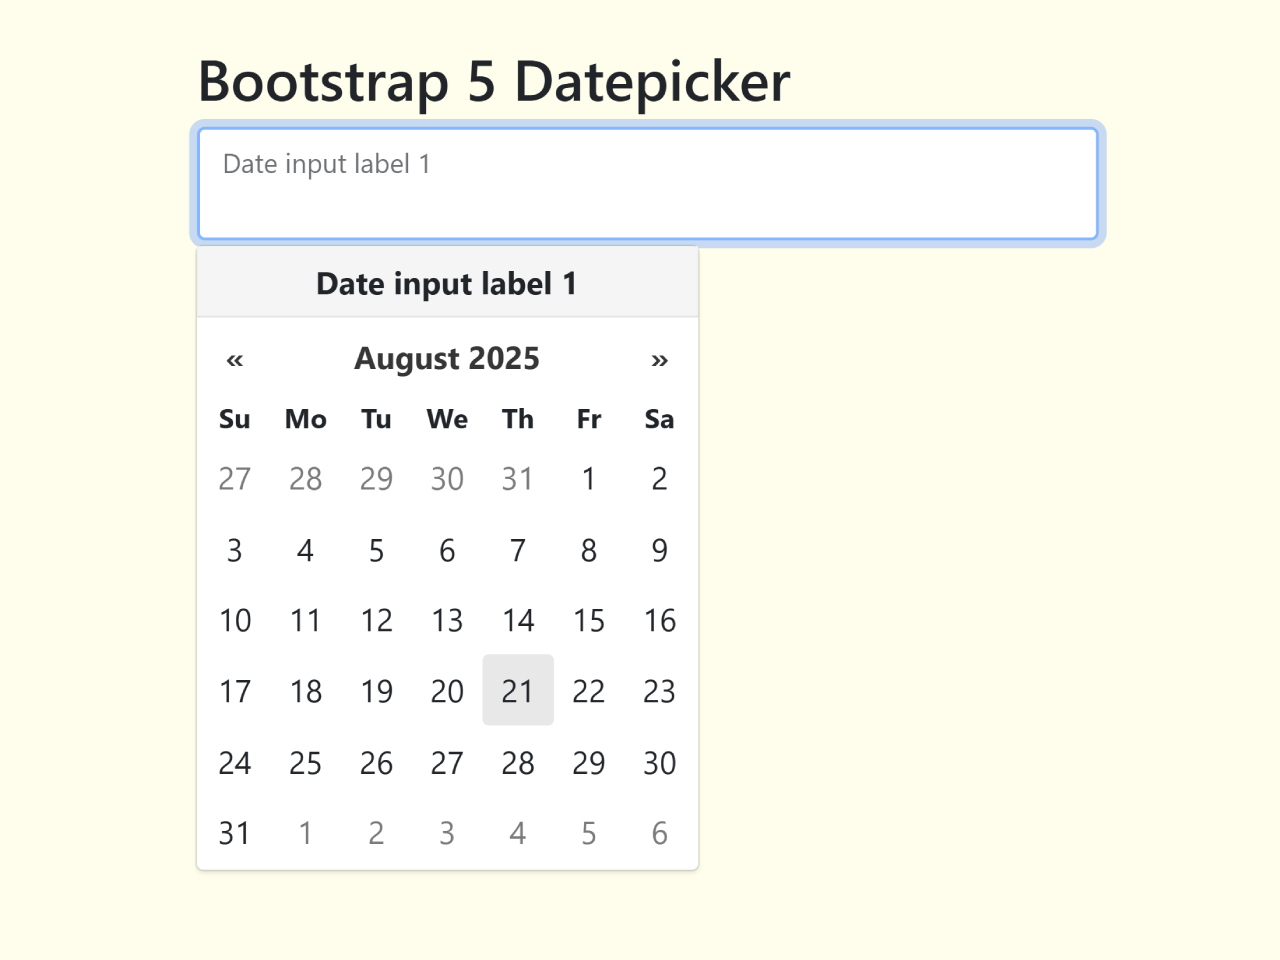
<h2>Floating label only</h2>
<div class="form-floating mb-4 d-flex">
<input
type="text"
class="datepicker_input form-control border-2"
id="datepicker1"
required
placeholder="DD/MM/YYYY">
<label for="datepicker1">Date input label 1</label>
</div>
<h2>Input group only</h2>
<div class="input-group mb-4">
<i class="bi bi-calendar-date input-group-text"></i>
<input type="text" class="datepicker_input form-control" placeholder="Date input 3 placeholder" required aria-label="Date input 3 (using aria-label)">
</div>
<h2>Floating label & input group</h2>
<div class="form-floating input-group mb-4">
<i class="bi bi-calendar-date input-group-text"></i>
<input type="text" id="datepicker2" class="datepicker_input form-control" placeholder="DD/MM/YYYY" required>
<label for="datepicker2">Date input label 2</label>
</div>
<p>Requires <a target=_blank title="[new window]" href="https://mymth.github.io/vanillajs-datepicker/#/">vanillajs-datepicker</a> plus the usual Bootstrap 5 CSS & JS.</p>
Step 3: Add CSS Styles
Include the following CSS to customize the appearance of your datepicker and ensure proper integration with Bootstrap. This styles the overall layout and adjusts floating labels to work correctly with the datepicker icon.
/* Bootstrap 5 CSS and icons included */
/* vanillajs-datepicker 1.1.4 CSS included */

body {
  /* Centring content */
  min-height: 100vh;
  display: grid !important;
  place-content: center;
}

/* Adapts a floating label for use with a left-handed input group icon */
.form-floating > .bi-calendar-date + .datepicker_input + label {
  padding-left: 3.5rem;
  z-index: 3;
}
Step 4: Add JavaScript Functionality
Finally, add this JavaScript code before the closing `<body>` tag. This code initializes the datepickers, setting the date format and dynamically generating titles from labels or `aria-label` attributes.
/* Bootstrap 5 JS included */
/* vanillajs-datepicker 1.1.4 JS included */

const getDatePickerTitle = elem => {
  // From the label or the aria-label
  const label = elem.nextElementSibling;
  let titleText = '';
  if (label && label.tagName === 'LABEL') {
    titleText = label.textContent;
  } else {
    titleText = elem.getAttribute('aria-label') || '';
  }
  return titleText;
}

const elems = document.querySelectorAll('.datepicker_input');
for (const elem of elems) {
  const datepicker = new Datepicker(elem, {
    'format': 'dd/mm/yyyy', // UK format
    title: getDatePickerTitle(elem)
  });
}
Step 5: Include Footer Assets
Finally, add the Bootstrap JS and Datepicker JS just before closing the body tag.
<script src='https://cdnjs.cloudflare.com/ajax/libs/bootstrap/5.1.1/js/bootstrap.min.js'></script>
<script src='https://cdn.jsdelivr.net/npm/vanillajs-datepicker@1.1.4/dist/js/datepicker-full.min.js'></script>
That’s it! You’ve successfully created a Bootstrap 5 datepicker using Vanilla JavaScript. If you have any questions or suggestions, feel free to comment below.


Perfect! Thank you.
I made this into a Blazor Component for my project and I love it.
You’re welcome. Glad to hear that its helpful for you.