
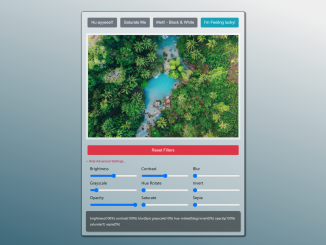
This tutorial guides you through the process of building a Css Image Filter Editor In Javascript. This tool will allow you to dynamically manipulate image styles using CSS filters directly within your web browser, offering immediate visual feedback and enhanced user engagement. You will be able to create stunning visual effects by adjusting parameters like brightness, contrast, saturation, and more, providing users with a simple yet powerful image editing experience.
Project Setup
HTML Structure
First, you will need to set up the basic HTML structure for your image editor. This includes setting up the image display area and the controls for adjusting the CSS filters.
<html lang="en">

<head>
    <meta charset="UTF-8">
    <meta name="viewport" content="width=device-width, initial-scale=1.0">
    <meta http-equiv="X-UA-Compatible" content="ie=edge">
    <title>Image Editor</title>
    <link rel="stylesheet" href="https://www.w3schools.com/w3css/4/w3.css">
    <link rel="stylesheet" href="https://maxcdn.bootstrapcdn.com/font-awesome/4.7.0/css/font-awesome.min.css">
    <link rel="stylesheet" href="https://maxcdn.bootstrapcdn.com/bootstrap/4.0.0/css/bootstrap.min.css">

</head>

<body>

<div class="wrapper">
        <div class="image-wrapper">
            <div class="filterButton">
                <button class="btn btn-secondary" data-filter="hue-rotate(140deg)">Hu ayyeee!!</button>
                <button class="btn btn-secondary" data-filter="saturate(2)">Saturate Me</button>
                <button class="btn btn-secondary" data-filter="grayscale(100%)">Meh! - Black & White</button>
                <button class="btn btn-info" data-filter="invert(100%) hue-rotate(140deg)">I'm Feeling lucky!</button>
            </div>

            <img src="https://images.unsplash.com/photo-1504532472068-9ae844337da7?ixlib=rb-0.3.5&ixid=eyJhcHBfaWQiOjEyMDd9&s=6e76ebffebd8e3c65985875554e36f35&auto=format&fit=crop&w=2234&q=80">

            <button class="reset btn btn-danger">Reset Filters</button>

            <div class="toggleAdvanced">
                <i class="fa fa-angle-down">
                    <span>Show Advanced Settings...</span>
                </i>
            </div>

            <div class="image-controls">

                <div>
                    <label>Brightness</label>
                    <input type="range" value="100" step="1" data-filter="brightness" data-scale="%" onchange="applyFilter()" min="0" max="200">
                </div>
                <div>
                    <label>Contrast</label>
                    <input type="range" value="100" step="1" data-filter="contrast" data-scale="%" onchange="applyFilter()" min="0" max="200">
                </div>
                <div>
                    <label>Blur</label>
                    <input type="range" value="0" step="1" data-filter="blur" data-scale="px" onchange="applyFilter()" min="0" max="100">
                </div>
                <div>
                    <label>Grayscale</label>
                    <input type="range" value="0" step="1" data-filter="grayscale" data-scale="%" onchange="applyFilter()" min="0" max="100">
                </div>
                <div>
                    <label>Hue Rotate</label>
                    <input type="range" value="0" step="1" data-filter="hue-rotate" data-scale="deg" onchange="applyFilter()" min="0" max="360">
                </div>
                <div>
                    <label>Invert</label>
                    <input type="range" value="0" step="1" data-filter="invert" data-scale="%" onchange="applyFilter()" min="0" max="100">
                </div>
                <div>
                    <label>Opacity</label>
                    <input type="range" value="100" step="1" data-filter="opacity" data-scale="%" onchange="applyFilter()" min="0" max="100">
                </div>
                <div>
                    <label>Saturate</label>
                    <input type="range" value="1" step="1" data-filter="saturate" data-scale="" onchange="applyFilter()" min="1" max="100">
                </div>
                <div>
                    <label>Sepia</label>
                    <input type="range" value="0" step="1" data-filter="sepia" data-scale="%" onchange="applyFilter()" min="0" max="100">
                </div>
            </div>
            <div class="filterSummary"> </div>
        </div>
    </div>
CSS Styling
Next, add CSS to style the image editor, making it visually appealing and user-friendly. The styles will also handle the layout and appearance of the filter controls.
html {
            box-sizing: border-box;
        }

        *,
        *:after,
        *:before {
            box-sizing: inherit;
        }

        body {
            margin: 0;
            font-family: sans-serif;
            font-weight: 200;
            font-size: 1.2rem;
            min-height: 100vh;
            background: linear-gradient(200deg, #eee 10%, #326273);
        }

        .wrapper {
            max-width: 600px;
            margin: 5rem auto;
            background: rgba(255, 0255, 255, 0.4);
            padding: 1rem;
            border-radius: 5px;
            box-shadow: 2px 2px 3px 4px rgba(0, 0, 0, 0.5)
        }

        .image-wrapper {
            display: flex;
            flex-direction: column;
        }

        .filterButton {
            display: flex;
            flex-wrap: wrap;
        }

        .filterButton>* {
            flex: 1;

        }

        .btn {
            font-family: sans-serif;
            font-weight: 200;
            font-size: 0.8;
            line-height: 1.5rem;
            padding: .5rem;
            margin: .4rem;
        }

        .image-controls {

            display: none;
            flex-wrap: wrap;
            color: #000;
            font-size: 1rem;
            line-height: 1.5rem;
            animation-duration: 1.5s;
        }

        .image-controls.active {
            display: flex;

        }

        .image-controls div {
            margin: 0.5rem 0 0 1rem;
        }

        .image-controls div:active {
            color: white;
            transition: all .2s;
        }

        .image-controls>* {
            display: flex;
            flex: 1 1 calc(33.333% - 1rem);
            flex-direction: column;
        }

        img {

            max-width: 100%;
            margin: 1rem 0;
            padding: 0.5rem;
            background: rgba(255, 255, 255, 0.5);
        }

        .filterSummary {
            margin-top: 1rem;
            font-size: .8rem;
            line-height: 1.5rem;
            background: rgba(0, 0, 0, 0.5);
            padding: 1rem;
            color: white;
            box-shadow: 2px 2px 3px rgba(0, 0, 0, 0.5);
            border-radius: 5px;
            display: none;
        }

        .filterSummary.active {
            display: block;
        }

        .toggleAdvanced {
            font-size: .8rem;
            color: #AF1B3F;
            cursor: pointer;
            margin-top: .5rem;
        }

        .toggleAdvanced:hover {
            font-size: .8rem;
            color: white;

        }

        .toggleAdvanced span {
            font-family: sans-serif;
        }
JavaScript Functionality
Finally, implement the JavaScript code to handle user interactions, apply the CSS filters to the image, and update the filter values dynamically.
//Select Image
        const image = document.querySelector('img');
        //Select span to display values next to the label
        const summary = document.querySelector('.filterSummary');
        //Select Image controls  div
        const imageControlsContainer = document.querySelector('.image-controls');
        //Select all inputs
        const filterControls = [...document.querySelectorAll('input[type=range]')];
        //Select all buttons
        const filterButtons = [...document.querySelectorAll('button')];

        const resetbutton = document.querySelector('.reset').addEventListener('click', resetFilters);
        const advancedButton = document.querySelector('.toggleAdvanced');


        function toggleAdvanced() {
            //Check if active class is present and  add .active if not
            if (!imageControlsContainer.classList.contains('active')) {
                imageControlsContainer.classList.add('active', 'w3-animate-opacity')
                advancedButton.innerHTML = `
                <i class="fa fa-angle-up">
                    <span>Hide Advanced Settings...</span>
                </i>

                `
            } else {
                imageControlsContainer.classList.remove('active')
                summary.classList.remove('active', 'w3-animate-opacity');
                advancedButton.innerHTML = `
                <i class="fa fa-angle-down">
                    <span>Show Advanced Settings...</span>
                </i>
                `
            }


        }

        //Function to run when each button it clicked
        function selectFilter(e) {
            //Get filter value
            const clickedFilter = e.target.getAttribute('data-filter');
            console.log(clickedFilter);

            image.style.filter += clickedFilter;

        }
        //RESET ALL FILTERS
        function resetFilters() {
            image.style.filter = '';
        }

        function applyFilter() {
            //Initialise variable to store filters
            let filters = ''
            //Loop through each input
            filterControls.map(item => {
                const value = item.value;
                filters += item.getAttribute('data-filter') + '(' + value + item.getAttribute('data-scale') + ') ';
                console.log(filters);

                image.style.filter = filters;
                summary.innerHTML = filters;
                summary.classList.add('active');
            })
        }

        filterControls.forEach(item => item.addEventListener('active', applyFilter));

        filterButtons.forEach(button => button.addEventListener('click', selectFilter));

        advancedButton.addEventListener('click', toggleAdvanced);
In conclusion, this tutorial has walked you through creating a Css Image Filter Editor In Javascript, enabling dynamic image manipulation directly in the browser.


