
This tutorial will guide you through creating a drag and drop task list in JavaScript. This interactive tool allows users to manage tasks by visually moving them between different stages like “To Do,” “Doing,” and “Done,” enhancing productivity and workflow management.
Adding Header Assets
First, we need to include the necessary CSS files for styling and normalization. Place these links within the <head> section of your HTML document.
<link rel="stylesheet" href="https://public.codepenassets.com/css/normalize-5.0.0.min.css">
<link rel='stylesheet' href='https://cdnjs.cloudflare.com/ajax/libs/normalize/8.0.0/normalize.css'>
Creating the HTML Structure
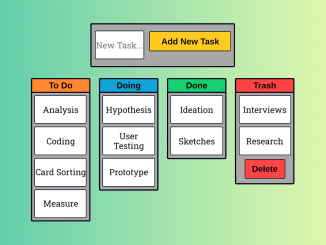
Now, let’s build the basic HTML structure for our drag and drop task list. This includes the header, input field for adding new tasks, the main container with columns for different task statuses, and a footer.
<header>
  <h1>Drag & Drop<br/><span>Lean Kanban Board</span></h1>
</header>

<div class="add-task-container">
  <input type="text" maxlength="12" id="taskText" placeholder="New Task..." onkeydown="if (event.keyCode == 13)
                        document.getElementById('add').click()">
  <button id="add" class="button add-button" onclick="addTask()">Add New Task</button>
</div>

<div class="main-container">
  <ul class="columns">

    <li class="column to-do-column">
      <div class="column-header">
        <h4>To Do</h4>
      </div>
      <ul class="task-list" id="to-do">
        <li class="task">
          <p>Analysis</p>
        </li>
        <li class="task">
          <p>Coding</p>
        </li>
        <li class="task">
          <p>Card Sorting</p>
        </li>
        <li class="task">
          <p>Measure</p>
        </li>
      </ul>
    </li>

    <li class="column doing-column">
      <div class="column-header">
        <h4>Doing</h4>
      </div>
      <ul class="task-list" id="doing">
        <li class="task">
          <p>Hypothesis</p>
        </li>
        <li class="task">
          <p>User Testing</p>
        </li>
        <li class="task">
          <p>Prototype</p>
        </li>
      </ul>
    </li>

    <li class="column done-column">
      <div class="column-header">
        <h4>Done</h4>
      </div>
      <ul class="task-list" id="done">
        <li class="task">
          <p>Ideation</p>
        </li>
        <li class="task">
          <p>Sketches</p>
        </li>
      </ul>
    </li>

    <li class="column trash-column">
      <div class="column-header">
        <h4>Trash</h4>
      </div>
      <ul class="task-list" id="trash">
        <li class="task">
          <p>Interviews</p>
        </li>
        <li class="task">
          <p>Research</p>
        </li>

      </ul>
      <div class="column-button">
        <button class="button delete-button" onclick="emptyTrash()">Delete</button>
      </div>
    </li>

  </ul>
</div>

<footer>
  <p>Built with <a href="https://github.com/bevacqua/dragula" target="_blank">Dragula</a> and Vanilla JS by <a href="http://nikkipantony.com" target="_blank">Nikki Pantony</a></p>
</footer>
    <script src='https://cdnjs.cloudflare.com/ajax/libs/dragula/3.7.2/dragula.js'></script><script  src="./script.js"></script>
Styling with CSS
Next, apply the following CSS styles to visually enhance the task list. This will define the layout, colors, fonts, and overall appearance of the application.
@import url("https://fonts.googleapis.com/css?family=Arimo:400,700|Roboto+Slab:400,700");

:root {
  font-size: calc(0.5vw + 1vh);
}

* {
  -webkit-box-sizing: border-box;
  box-sizing: border-box;
}

body {
  min-width: 420px;
}

h1,
h4 {
  font-family: "Arimo", sans-serif;
  line-height: 1.3;
}

header h1 {
  font-size: 2.4rem;
  margin: 4rem auto;
}

span {
  font-size: 3rem;
}

p {
  font-family: "Roboto Slab", serif;
}

a,
a:link,
a:active,
a:visited {
  color: #0066aa;
  text-decoration: none;
  border-bottom: #000013 0.16rem solid;
}

a:hover {
  color: #000013;
  border-bottom: #0066aa 0.16rem solid;
}

header,
footer {
  width: 40rem;
  margin: 2rem auto;
  text-align: center;
}

.add-task-container {
  display: -webkit-box;
  display: -ms-flexbox;
  display: flex;
  width: 20rem;
  height: 5.3rem;
  margin: auto;
  background: #a8a8a8;
  border: #000013 0.2rem solid;
  border-radius: 0.2rem;
  padding: 0.4rem;
}

.main-container {
  display: -webkit-box;
  display: -ms-flexbox;
  display: flex;
}

.columns {
  display: -webkit-box;
  display: -ms-flexbox;
  display: flex;
  -webkit-box-align: start;
  -ms-flex-align: start;
  align-items: flex-start;
  margin: 1.6rem auto;
}

.column {
  width: 8.4rem;
  margin: 0 0.6rem;
  background: #a8a8a8;
  border: #000013 0.2rem solid;
  border-radius: 0.2rem;
}

.column-header {
  padding: 0.1rem;
  border-bottom: #000013 0.2rem solid;
}

.column-header h4 {
  text-align: center;
}

.to-do-column .column-header {
  background: #ff872f;
}

.doing-column .column-header {
  background: #13a4d9;
}

.done-column .column-header {
  background: #15d072;
}

.trash-column .column-header {
  background: #ff4444;
}

.task-list {
  min-height: 3rem;
}

ul {
  list-style-type: none;
  margin: 0;
  padding: 0;
}

li {
  list-style-type: none;
}

.column-button {
  text-align: center;
  padding: 0.1rem;
}

.button {
  font-family: "Arimo", sans-serif;
  font-weight: 700;
  border: #000013 0.14rem solid;
  border-radius: 0.2rem;
  color: #000013;
  padding: 0.6rem 1rem;
  margin-bottom: 0.3rem;
  cursor: pointer;
}

.delete-button {
  background-color: #ff4444;
  margin: 0.1rem auto 0.6rem auto;
}

.delete-button:hover {
  background-color: #fa7070;
}

.add-button {
  background-color: #ffcb1e;
  padding: 0 1rem;
  height: 2.8rem;
  width: 10rem;
  margin-top: 0.6rem;
}

.add-button:hover {
  background-color: #ffdd6e;
}

.task {
  display: -webkit-box;
  display: -ms-flexbox;
  display: flex;
  -webkit-box-pack: center;
  -ms-flex-pack: center;
  justify-content: center;
  vertical-align: middle;
  list-style-type: none;
  background: #fff;
  -webkit-transition: all 0.3s;
  transition: all 0.3s;
  margin: 0.4rem;
  height: 4rem;
  border: #000013 0.15rem solid;
  border-radius: 0.2rem;
  cursor: move;
  text-align: center;
  vertical-align: middle;
}

#taskText {
  background: #fff;
  border: #000013 0.15rem solid;
  border-radius: 0.2rem;
  text-align: center;
  font-family: "Roboto Slab", serif;
  height: 4rem;
  width: 7rem;
  margin: auto 0.8rem auto 0.1rem;
}

.task p {
  margin: auto;
}

/* Dragula CSS Release 3.2.0 from: https://github.com/bevacqua/dragula */

.gu-mirror {
  position: fixed !important;
  margin: 0 !important;
  z-index: 9999 !important;
  opacity: 0.8;
  -ms-filter: "progid:DXImageTransform.Microsoft.Alpha(Opacity=80)";
  filter: alpha(opacity=80);
}

.gu-hide {
  display: none !important;
}

.gu-unselectable {
  -webkit-user-select: none !important;
  -moz-user-select: none !important;
  -ms-user-select: none !important;
  user-select: none !important;
}

.gu-transit {
  opacity: 0.2;
  -ms-filter: "progid:DXImageTransform.Microsoft.Alpha(Opacity=20)";
  filter: alpha(opacity=20);
}
Implementing Drag and Drop Functionality with JavaScript
Now, let’s implement the JavaScript code to enable the drag and drop functionality. This script initializes Dragula to allow tasks to be moved between columns and includes functions for adding new tasks and clearing the trash column.
/* Custom Dragula JS */
dragula([
  document.getElementById("to-do"),
  document.getElementById("doing"),
  document.getElementById("done"),
  document.getElementById("trash")
]);
removeOnSpill: false
  .on("drag", function(el) {
    el.className.replace("ex-moved", "");
  })
  .on("drop", function(el) {
    el.className += "ex-moved";
  })
  .on("over", function(el, container) {
    container.className += "ex-over";
  })
  .on("out", function(el, container) {
    container.className.replace("ex-over", "");
  });

/* Vanilla JS to add a new task */
function addTask() {
  /* Get task text from input */
  var inputTask = document.getElementById("taskText").value;
  /* Add task to the 'To Do' column */
  document.getElementById("to-do").innerHTML +=
    "<li class='task'><p>" + inputTask + "</p></li>";
  /* Clear task text from input after adding task */
  document.getElementById("taskText").value = "";
}

/* Vanilla JS to delete tasks in 'Trash' column */
function emptyTrash() {
  /* Clear tasks from 'Trash' column */
  document.getElementById("trash").innerHTML = "";
}
Finalizing the Setup
With the HTML structure, CSS styling, and JavaScript functionality in place, you should now have a fully functional drag and drop task list.
In conclusion, this tutorial provided a step-by-step guide to create a drag and drop task list in JavaScript. This project showcases how to use HTML, CSS, and JavaScript libraries like Dragula to build interactive and user-friendly web applications.


