This tutorial will guide you through the process of implementing Javascript compress image before upload functionality. Compressing images client-side before uploading them to a server can significantly reduce bandwidth usage, improve upload speeds, and enhance the overall user experience, especially for users with limited internet bandwidth.
Setting Up the HTML Structure
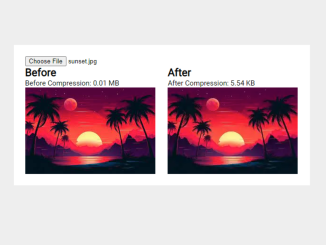
First, you need to create the basic HTML elements that will allow users to upload images and display the results of the compression. This involves an input field for file selection, paragraph elements to display file sizes, and image elements to show the before-and-after versions.
<input type="file" name="upload-image" id="upload-image" required />
<p name="before-compression"></p>
<p name="after-compression"></p>
<img src="" class="before" style="display:none;"/>
<canvas style="display: none;"></canvas>
<img src="" class="after" style="display:none;"/>
    <script  src="./script.js"></script>
Implementing the JavaScript Compression Logic
The core of the image compression lies in the JavaScript code. This section explains how to read the selected image file, compress it using the canvas API, and display the compressed image along with its size.
Reading and Displaying the Original Image
This part involves using the FileReader API to read the selected image as a data URL and displaying it in an image element. The original file size is also displayed.
Compressing the Image Using Canvas
The canvas element is used to redraw the image at a lower quality, effectively compressing it. The toDataURL method is then used to get the compressed image as a webp format.
Displaying the Compressed Image and Size
Finally, the compressed image is displayed, and its file size is calculated and shown.
const ReadAndCompress = (e) => {
  const size = `Before Compression: ${(e.target.files[0].size/(1000*1024)).toFixed(2)} MB`;
  document.querySelector("p[name=before-compression]").innerHTML = size;
  const reader = new FileReader();
  reader.readAsDataURL(e.target.files[0]);

  reader.onload = event => {
    const img = document.querySelector("img.before");
    img.src = event.target.result;
    //img.style = "display: true";
    img.onload = () => {
      const width = img.width;
      const height = img.height;
      const elem = document.querySelector('canvas');
      elem.width = width;
      elem.height = height;
      const ctx = elem.getContext('2d');
      ctx.drawImage(img, 0, 0, width, height);
      const webp = ctx.canvas.toDataURL("image/webp", 0.5);
      const imgAfter = document.querySelector("img.after");
      imgAfter.src = webp;
      //imgAfter.style = "display: true";
      const head = 'data:image/webp;base64,';
      const imgFileSize = (Math.round((webp.length - head.length)*3/4) / (1000)).toFixed(2);
      document.querySelector("p[name=after-compression]").innerHTML =
        `After Compression: ${imgFileSize} KB`;
    },
    reader.onerror = error => console.error(error);
  }
}

document.querySelector("input[name=upload-image]")
.addEventListener("change", (event) => ReadAndCompress(event))
While not strictly necessary, adding some basic CSS can improve the appearance of your image compression tool.
You have now successfully implemented Javascript compress image before upload functionality. You can further customize and enhance this code to suit your specific needs, such as adjusting the compression quality or adding more advanced image manipulation features.