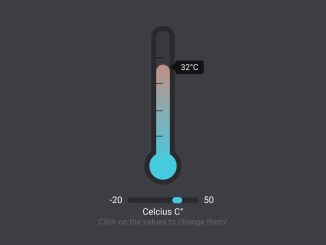
Here’s a comprehensive guide on how to create a functional and visually appealing thermometer slider widget using JavaScript. This widget provides an intuitive way to display and adjust temperature values, making it a useful component for various applications such as weather dashboards, climate control interfaces, and scientific simulations.
Setting Up the HTML Structure
First, we need to create the basic HTML structure for our thermometer slider widget. This includes the main container, the thermometer display, the temperature indicator, the graduations, and the interactive range slider with min/max input fields.
<div id="wrapper">
	<div id="termometer">
		<div id="temperature" style="height:0" data-value="0°C"></div>
		<div id="graduations"></div>
	</div>

	<div id="playground">
		<div id="range">
			<input id="minTemp" type="text" value="-20">
			<input type="range" min="-20" max="50" value="42">
			<input id="maxTemp" type="text" value="50">
		</div>
		<p id="unit">Celcius C°</p>
	</div>

	<p id="info">Click on the values to change them!</p>
</div>
    <script  src="./script.js"></script>
Styling the Thermometer with CSS
Now, let’s apply some CSS styles to make the thermometer visually appealing. We’ll style the main container, the thermometer itself, the temperature indicator, the slider, and other elements to create a user-friendly interface.
@import url("https://fonts.googleapis.com/css?family=Jaldi&display=swap");
body {
  display: flex;
  height: 100vh;
  margin: 0;
  background: #3d3d44;
  font-family: "Jaldi", sans-serif;
  font-size: 14px;
  color: white;
}

#wrapper {
  margin: auto;
  display: flex;
  flex-direction: column;
  align-items: center;
}

p {
  -webkit-user-select: none;
  -moz-user-select: none;
  -ms-user-select: none;
  user-select: none;
}

#info {
  opacity: 0.2;
  margin: 0;
  text-align: center;
}

#termometer {
  width: 25px;
  background: #38383f;
  height: 240px;
  position: relative;
  border: 9px solid #2a2a2e;
  border-radius: 20px;
  z-index: 1;
  margin-bottom: 50px;
}
#termometer:before, #termometer:after {
  position: absolute;
  content: "";
  border-radius: 50%;
}
#termometer:before {
  width: 100%;
  height: 34px;
  bottom: 9px;
  background: #38383f;
  z-index: -1;
}
#termometer:after {
  transform: translateX(-50%);
  width: 50px;
  height: 50px;
  background-color: #3dcadf;
  bottom: -41px;
  border: 9px solid #2a2a2e;
  z-index: -3;
  left: 50%;
}
#termometer #graduations {
  height: 59%;
  top: 20%;
  width: 50%;
}
#termometer #graduations, #termometer #graduations:before {
  position: absolute;
  border-top: 2px solid rgba(0, 0, 0, 0.5);
  border-bottom: 2px solid rgba(0, 0, 0, 0.5);
}
#termometer #graduations:before {
  content: "";
  height: 34%;
  width: 100%;
  top: 32%;
}
#termometer #temperature {
  bottom: 0;
  background: linear-gradient(#f17a65, #3dcadf) no-repeat bottom;
  width: 100%;
  border-radius: 20px;
  background-size: 100% 240px;
  transition: all 0.2s ease-in-out;
}
#termometer #temperature, #termometer #temperature:before, #termometer #temperature:after {
  position: absolute;
}
#termometer #temperature:before {
  content: attr(data-value);
  background: rgba(0, 0, 0, 0.7);
  color: white;
  z-index: 2;
  padding: 5px 10px;
  border-radius: 5px;
  font-size: 1em;
  line-height: 1;
  transform: translateY(50%);
  left: calc(100% + 1em / 1.5);
  top: calc(-1em + 5px - 5px * 2);
}
#termometer #temperature:after {
  content: "";
  border-top: 0.4545454545em solid transparent;
  border-bottom: 0.4545454545em solid transparent;
  border-right: 0.6666666667em solid rgba(0, 0, 0, 0.7);
  left: 100%;
  top: calc(-1em / 2.2 + 5px);
}

#playground {
  font-size: 1.1em;
}
#playground #range {
  display: flex;
}
#playground #range input[type=text] {
  width: 2em;
  background: transparent;
  border: none;
  color: inherit;
  font: inherit;
  margin: 0 5px;
  padding: 0px 5px;
  border-bottom: 2px solid transparent;
  transition: all 0.2s ease-in-out;
}
#playground #range input[type=text]:focus {
  border-color: #3dcadf;
  outline: none;
}
#playground #range input[type=text]:first-child {
  text-align: right;
}
#playground #unit {
  width: 100%;
  margin: 0;
  text-align: center;
}
#playground #unit:hover {
  cursor: pointer;
}

input[type=range] {
  -webkit-appearance: none;
  background: transparent;
  margin: 5.5px 0;
  width: 100%;
}
input[type=range]::-moz-focus-outer {
  border: 0;
}
input[type=range]:hover {
  cursor: pointer;
}
input[type=range]:focus {
  outline: 0;
}
input[type=range]:focus::-webkit-slider-runnable-track {
  background: #313137;
  border-color: #313137;
}
input[type=range]:focus::-ms-fill-lower {
  background: #2a2a2e;
}
input[type=range]:focus::-ms-fill-upper {
  background: #313137;
  border-color: #313137;
}
input[type=range]::-webkit-slider-runnable-track {
  cursor: default;
  height: 10px;
  transition: all 0.2s ease;
  width: 100%;
  cursor: pointer;
  transition: all 0.2s ease-in-out;
  box-shadow: 1px 1px 1px transparent, 0 0 1px rgba(13, 13, 13, 0);
  background: #2a2a2e;
  border: 2px solid #2a2a2e;
  border-radius: 5px;
}
input[type=range]::-webkit-slider-thumb {
  box-shadow: 4px 4px 4px transparent, 0 0 4px rgba(13, 13, 13, 0);
  background: #3dcadf;
  border: 0px solid #3d3d44;
  border-radius: 12px;
  cursor: pointer;
  height: 11px;
  width: 18px;
  -webkit-appearance: none;
  margin-top: -2.5px;
}
input[type=range]::-moz-range-track {
  box-shadow: 1px 1px 1px transparent, 0 0 1px rgba(13, 13, 13, 0);
  cursor: default;
  height: 10px;
  transition: all 0.2s ease;
  width: 100%;
  cursor: pointer;
  transition: all 0.2s ease-in-out;
  background: #2a2a2e;
  border: 2px solid #2a2a2e;
  border-radius: 5px;
  height: 5px;
}
input[type=range]::-moz-range-thumb {
  box-shadow: 4px 4px 4px transparent, 0 0 4px rgba(13, 13, 13, 0);
  background: #3dcadf;
  border: 0px solid #3d3d44;
  border-radius: 12px;
  cursor: pointer;
  height: 7px;
  width: 14px;
}
input[type=range]::-ms-track {
  cursor: default;
  height: 10px;
  transition: all 0.2s ease;
  width: 100%;
  cursor: pointer;
  transition: all 0.2s ease-in-out;
  background: transparent;
  border-color: transparent;
  border-width: 5.5px 0;
  color: transparent;
}
input[type=range]::-ms-fill-lower {
  box-shadow: 1px 1px 1px transparent, 0 0 1px rgba(13, 13, 13, 0);
  background: #222226;
  border: 2px solid #2a2a2e;
  border-radius: 10px;
}
input[type=range]::-ms-fill-upper {
  box-shadow: 1px 1px 1px transparent, 0 0 1px rgba(13, 13, 13, 0);
  background: #2a2a2e;
  border: 2px solid #2a2a2e;
  border-radius: 10px;
}
input[type=range]::-ms-thumb {
  box-shadow: 4px 4px 4px transparent, 0 0 4px rgba(13, 13, 13, 0);
  background: #3dcadf;
  border: 0px solid #3d3d44;
  border-radius: 12px;
  cursor: pointer;
  height: 7px;
  width: 14px;
  margin-top: 2.5px;
}
input[type=range]:disabled::-webkit-slider-thumb {
  cursor: not-allowed;
}
input[type=range]:disabled::-moz-range-thumb {
  cursor: not-allowed;
}
input[type=range]:disabled::-ms-thumb {
  cursor: not-allowed;
}
input[type=range]:disabled::-webkit-slider-runnable-track {
  cursor: not-allowed;
}
input[type=range]:disabled::-ms-fill-lower {
  cursor: not-allowed;
}
input[type=range]:disabled::-ms-fill-upper {
  cursor: not-allowed;
}
Implementing the JavaScript Functionality
Next, we’ll add the JavaScript code that makes the thermometer interactive. This will involve setting up variables, handling user input, updating the temperature display, and converting temperature units.
const units = {
  Celcius: "°C",
  Fahrenheit: "°F" };


const config = {
  minTemp: -20,
  maxTemp: 50,
  unit: "Celcius" };


// Change min and max temperature values

const tempValueInputs = document.querySelectorAll("input[type='text']");

tempValueInputs.forEach(input => {
  input.addEventListener("change", event => {
    const newValue = event.target.value;

    if (isNaN(newValue)) {
      return input.value = config[input.id];
    } else {
      config[input.id] = input.value;
      range[input.id.slice(0, 3)] = config[input.id]; // Update range
      return setTemperature(); // Update temperature
    }
  });
});

// Switch unit of temperature

const unitP = document.getElementById("unit");

unitP.addEventListener("click", () => {
  config.unit = config.unit === "Celcius" ? "Fahrenheit" : "Celcius";
  unitP.innerHTML = config.unit + ' ' + units[config.unit];
  return setTemperature();
});

// Change temperature

const range = document.querySelector("input[type='range']");
const temperature = document.getElementById("temperature");

function setTemperature() {
  temperature.style.height = (range.value - config.minTemp) / (config.maxTemp - config.minTemp) * 100 + "%";
  temperature.dataset.value = range.value + units[config.unit];
}

range.addEventListener("input", setTemperature);
setTimeout(setTemperature, 1000);
Adding Header Assets
Adding required header assets like CDN or import links.
Adding Footer Assets
Adding required footer assets like CDN or import links.
With these steps, you’ve successfully created a Thermometer Slider Widget using Javascript. This widget allows users to visually represent and adjust temperature values in a dynamic and interactive way.